I used to see those
gorgeous,
perfectly arranged,
must-have printables and think,
I love this. If only there was a spot for [insert organization idea here], it wold be perfect.This thought was usually followed by,
I wish I could make that myself, but I could never get my documents to look so professional until I discovered the capabilities of Google Slides.
If you look around on websites like
Teachers Pay Teachers and
Etsy, you can find people selling digital downloads and documents. Paying a lot of money for a document you could really make yourself can feel foolish, especially if its something that won't be easily editable. I've definitely used Microsoft Word and Google Docs to create documents and printables in the past, but I always struggle with making everything look seamless, especially when there were boxes or images floating around the page. After years of bring not-quite happy with my document-making process, I realized that
Google Slides offers everything I need to make documents. Slides lets you create shareable, download-friendly, individualized pages
for free and in any size.
Step One: Log into Google and Access Your Drive
You can log into Google through the
homepage, your
gmail, or any other Google service. Once you've logged in, you can access your drive, where all files will be stored in a cloud, at
drive.google.com or through the drive button.
I use Drive for all of the documents I make. I can quickly share things with colleagues, open up the cloud anywhere I can get online, and my documents can be downloaded in
seven different formats, which is important when you're developing a blog, selling items, or a perfectionist looking to create custom pages and images.
Step Two: Create a Slide
Once in your Drive, click "New" -> "Slides" to create a slide. From here, you can start developing your product.
Step Three: Select your Document Size

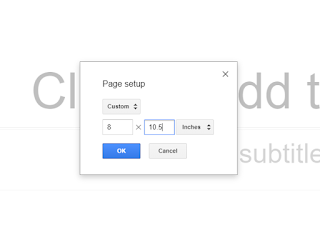
The first thing you need to do is determine your product size. You can size slides by pixels, inches, and a few other measurements. I usually choose 8" x 10.5", which creates a half-inch margin for a normal printer. You can also size images based on other factors. If you're planning on posting digital downloads online or printing on non-standard paper, this ability to resize a slide will keep your work from looking grainy, stretched, or otherwise warped.

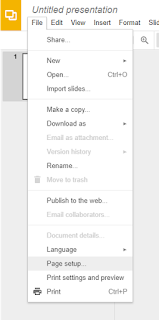
To choose the document size, click "File" -> "Page setup" and type in the size you want the page to be.
Step Four: Start Typing, Pasting, and Organizing Your Own Document
You can add text, borders, and shapes anywhere on Slides. You can resize, angle, and add shadows to anything. There are also options to move items in front of each other, as well as create transparency, recolor objects, and adjust the contrast in a particular image. I find the best way to learn these things is to experiment with the settings on your own. Often times, you'll discover a lot more of your options that way. If you aren't figuring it out on your own, a simple Google search, such as "
how to increase all font sizes slides," will get you the information you need.
Although any professional out there will tell you to take your own pictures, especially to avoid the legal issues that come with selling a product that features someone else's work, you can definitely find free, for commercial use, graphics on websites like
PixaBay.
Once you've created your digital download, you can click "File" -> "Download As" to save the document in various formats such as PDF, JPEG, PPT, and PNG.
Step Five: Create a Sales Account
Create an account, like other
successful digital document sellers, on
Teachers Pay Teachers,
Etsy, or another website you trust.
Often times, you do not need to pay anything to create an account or post products. The website you use will make a commission off of each item you sell. While you don't keep all of the money, you also aren't paying a cent until a product is sold on your site. Not only this, but these websites will have other resources, such as analytics, seller forums, and guides for making the most of your products.
Remember how Google Slides can be downloaded in any format? This is important because
certain websites will only accept certain document formats. I usually stick with PDFs because they tend to retain formatting the best and because my products are almost always the standard 8.5" x 11," but you may find that an editable PPT or something like a PNG image is best for your customers or your platform.
Once your document is in the right format, simply upload it to your website or online store!


