Featured

Simple Curb Appeal with New Outdoor Lighting

Okay, you guys, this project was on the "One day I'll get around to this" list, but I was laying in bed, putzing on my phone, and I happened to see this BRAND NEW Darby Home Dorchester Light Fixture for only $10 on Facebook Marketplace. Who can say no to saving $195?! As soon as I got up, I measured the size and messaged the seller. Out old outdoor light was fine. I guess. It was too small, not my style, and dated. Really, I wanted something pretty that would make a statement. If you're selecting a outdoor wall-mounted light fixture, pick one that is 1/3 to 1/4 of the size of your door. Yes, it will seem huge, but this is what will make your fixture pop, even from afar. Many houses I see have fixtures that look so tiny, and that is because people are trying to save money and don't measure properly. If you're not sure whether to replace a fixture yourself or hire a pro, Chelsea over at Two Twenty One goes through the general process here . When installin

A DIY Weekend Adventure: Floating Cat Shelves


In compact spaces, the vertical areas are valuable. So when I was struggling to find ways to keep the cat food away from the dogs and in a visually appealing, space-saving area, I went to the walls.

In compact spaces, the vertical areas are valuable. So when I was struggling to find ways to keep the cat food away from the dogs and in a visually appealing, space-saving area, I went to the walls.

As a searched online for cheap cat shelves, I saw people used inexpensive shelves with brackets to make DIY wall-mounted cat-climbers, but a lot of them were ugly. So I loved the idea, but not the look.

Places like Etsy had handmade cat shelves, but they were expensive, especially for a few boards of wood glued or nailed together.

After browsing the internet for way too long, I decided a shelf similar to this would be a great way to make attractive DIY floating shelves. Unfortunately, I do not have all those tools lying around, so I had to visit my dad who was kind enough to do the cuts for me. If you don't have a friend or family member who can do this, ask at your local hardware store. Many of them will cut the pieces for a small fee.

I did some modifications along the way:
As a searched online, I saw people used inexpensive shelves  with brackets to make a DIY wall-mounted cat-climbers, but a lot of them were ugly. So I loved the idea, but not the look.  Places like Etsy had handmade shelves, but they were expensive, especially for a few boards of wood glued or nailed together.  After browsing the internet for way too long, I decided...
  1. I measured the shelves to be a smaller size - about 7 inches by 10 inches. I am planning on doing one bigger one eventually - about 7 inches by 15 inches.
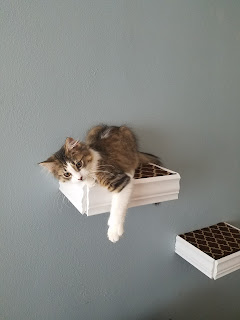
  2. I used moulding around the edges to make the shelves look more like they belonged in the space, as we have white moulding throughout the house. This also allowed me to create a small edge that would keep the carpet fabric from sliding off or looking unfinished.
  3. I attached the base directly to the wall mounts, so just had to place the tops on the wall mounts.
  4. I spray painted the wood and used a matte clear coat sealant.
  5. I bought a small, $2 carpet stair runner and cut it to fit the shelf.
With these shelves, the cat food is off the floor, away from the pups, and in an otherwise unused space. Mycroft feels like the king of the castle with his new hangout spot as well. Needless to say, everyone is happy with this project!


As a searched online, I saw people used inexpensive shelves  with brackets to make a DIY wall-mounted cat-climbers, but a lot of them were ugly. So I loved the idea, but not the look.  Places like Etsy had handmade shelves, but they were expensive, especially for a few boards of wood glued or nailed together.  After browsing the internet for way too long, I decided...


Popular Posts